Click LIKE & follow us on Facebook for recipe updates

COOK WITH LOVE FOR A HAPPY HIM

Singapore home cooking/ baking/ food & recipe blog features more than 500 tried & tested, quick & easy kid friendly recipes with steps by steps tutorial.


Follow us on Instagram: mfa_dingoozatfood


If you're a company looking for possible collaboration, feel free to send me a message via Miki's Food Archives Facebook Fan Page or email to miki9mak@gmail.com


Search This Blog

Monday 31 July 2017

Cheshire Cat & Randall Boggs Disney Theme Birthday Cake


July 27, 2016

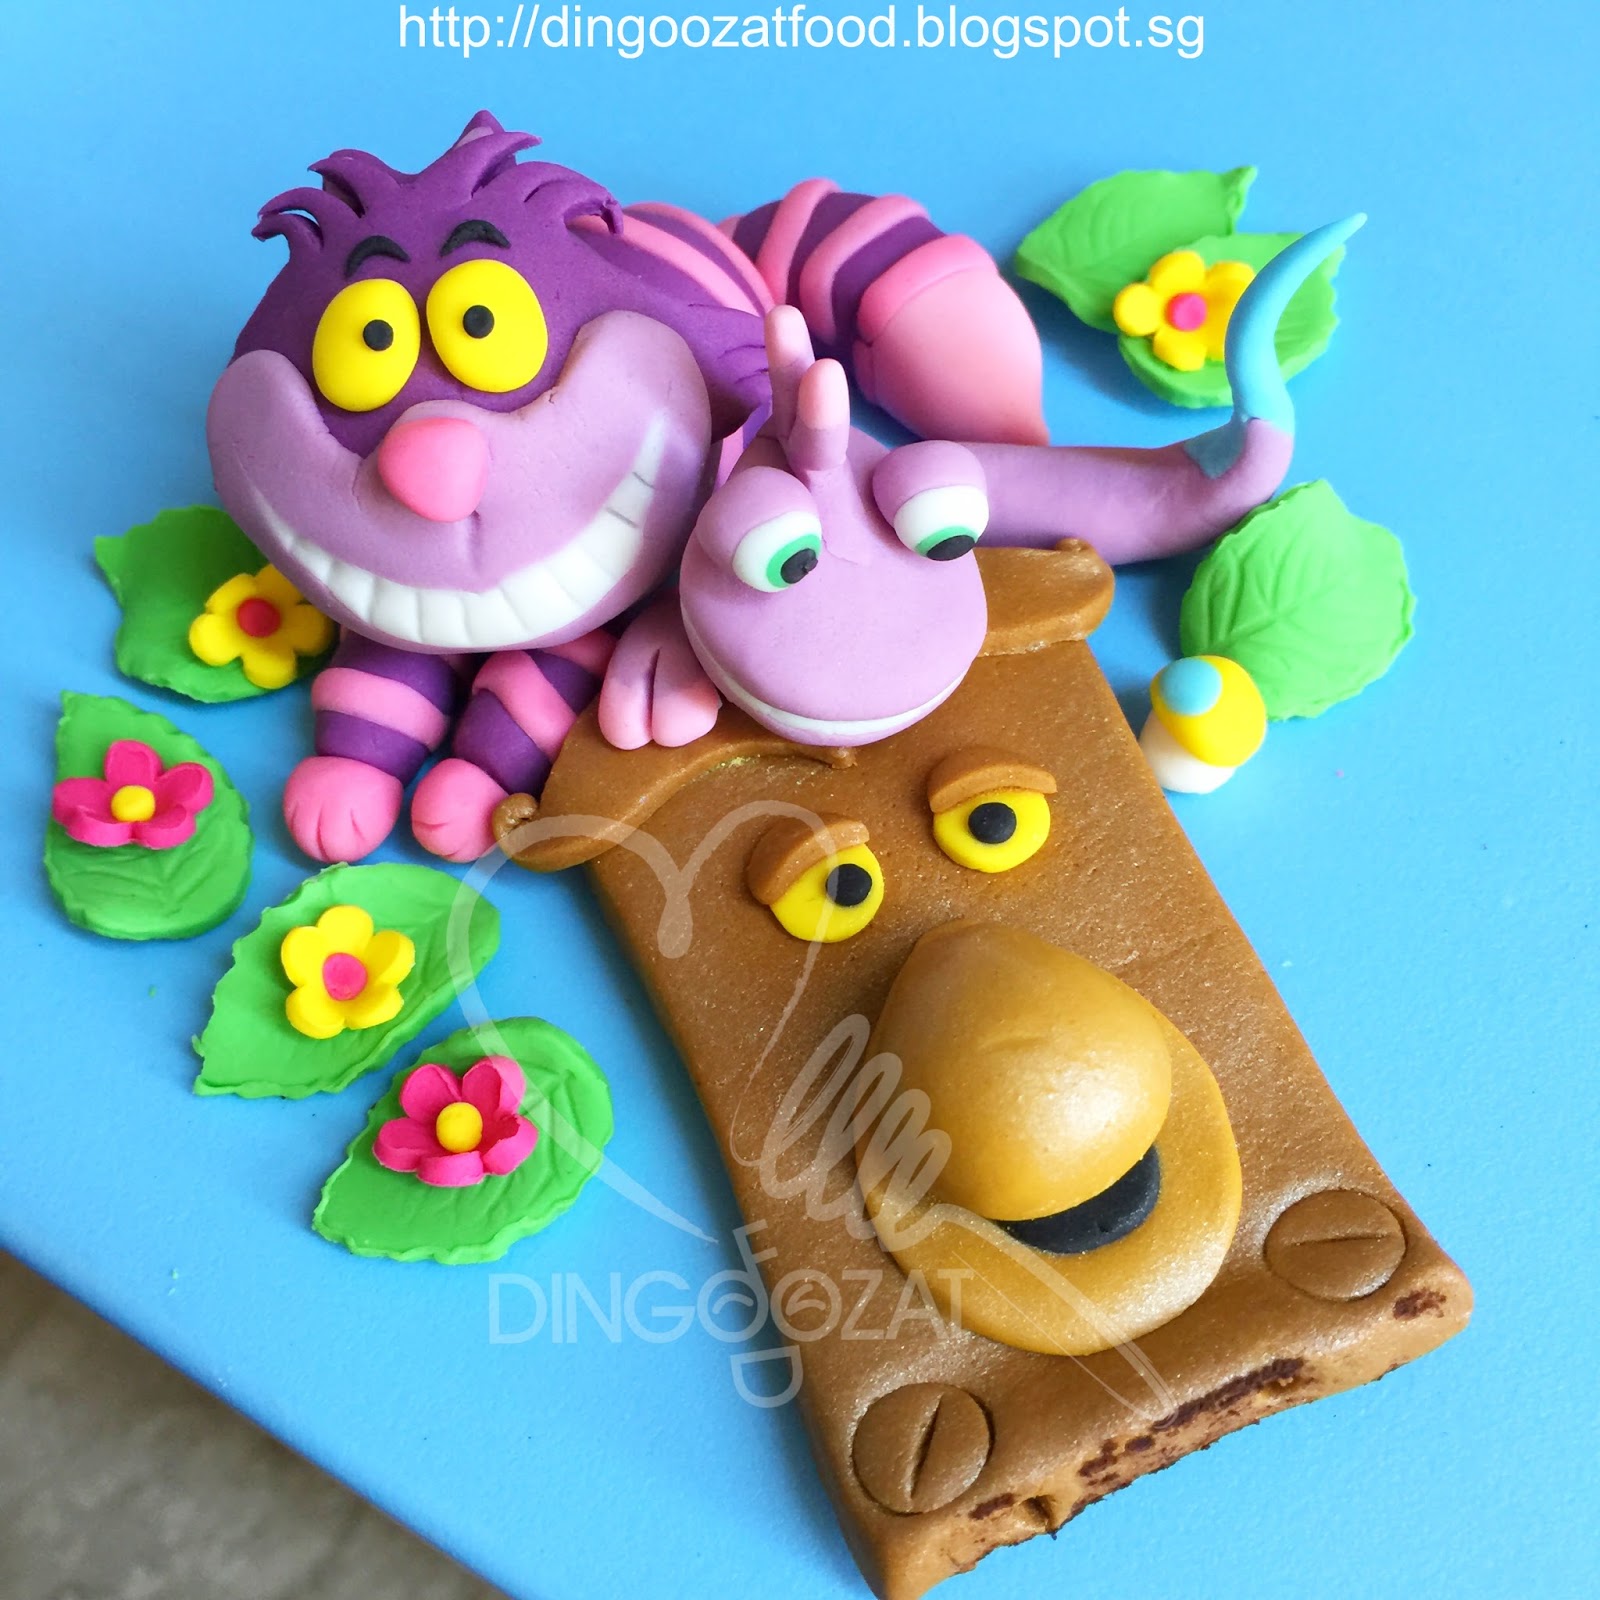
Cheshire Cat (Alice In Wonderland) & Randall Boggs (Monster University/ Monster Inc) Theme Birthday Cake that I made for my 7yo son. Cakes were homemade and every other decorations were hand shaped from scratch. 


My son's birthday cake is always unique because he chose the theme, I made the cake. 

"He chose the theme" , the theme never a simple and common one that one could find at any bakery or cake shop in Singapore. It has to be custom made, not by any bakers because mommy knows how..... :)


This year, he wanted a Cheshire Cat + Randall Boggs cake. Cheshire Cat from Alice In Wonderland and Randall Boggs from Monster University/ Monster Inc. 


Cheshire Cat

A close-up picture of my Cheshire Cat made of fondant.


Randall Boggs


A close-up picture of my Randall Boggs made of fondant.


These 2 Disney characters are not easy to shape from scratch especially with their smiling expression. The teeth were the hardest thing to do. 


Cheshire Cat in the making...

Randall Boggs in the making...


After the party, I removed all my fondant figurines from the cakes.
I'd keep these as long as I can. :)


He loves everything with Cheshire Cat colour, the purple and pink stripes. So all the cakes on his birthday this year were purple and pink. << Click here for cake recipe >>


I made some mini Nutella cupcakes for the kids. None left after the party. :) 
<< Click here for recipe >>


Here are some of the in-the-making photos:


~ Thank you ~ 

Monday 24 July 2017

Crispy Smelt aka Sha Zui Fish 香脆沙嘴鱼(沙尖)


This is a homey dish, my kind of comfort food that I have been craving for a long time. Miss the day that I lived at my parent's home, always have food ready on the dining table when I'm back from school. The dish that never fail to put a smile on my face, this is it. Mom's version was just salt and pepper, deep fried until so crispy that we could munch off the whole fish. Love to dip this in hot chili sauce. Simply palatable! 


Instead of using ground ginger in the marinade,
I used GINGEN ginger powder to enhance the flavour. 


Ingredients: 材料

8 Sha Zui Fish (220g) 沙嘴鱼 8条,大概 220克

Tempura flour/ Corn Flour 天妇罗炸粉/玉米粉/粟粉 适量

Cooking Oil 油 适量


Seasoning: 调味料

1/4 tsp Ground Ginger/ Gingen Ginger Powder 姜粉 1/4 小匙

1/2 tsp Garlic Powder 蒜粉 1/2小匙

1/4 tsp Salt 盐 1/4 小匙


If you are sharing this recipe, kindly attach the link to this blog instead of screen capture/ copy & paste/ use in your blog and claimed as your recipe! Thank you. 
如果您要分享此食谱,请联系这个部落格的相关链接。敬请不要复制或改篇为自己的食谱。谢谢!


Method: 步骤

1. Clean and pat dry the fish. Add seasoning and mix well. Cover and keep in the refrigerator, let marinate for at least 1 hour. 
将沙嘴鱼洗净抹干。加入调味料,拌均。用保鲜纸盖好,放进冰箱腌1小时。


2. Remove from the refrigerator, bring the fish to room temperature. 
腌好后取出,放置室温。


3. Heat oil in a frying pan. Generously coat the fish with Tempura flour/ corn flour. 
烧热油。沙嘴鱼粘上天妇罗炸粉/玉米粉/粟粉。


4. Deep fry the fish until golden and crisp. Remove and drain the excess oil before serving.
放进锅里炸至上色香脆,即可。若喜欢我的食谱,可以LIKE和追随我的面书专页,不要错过最新食谱发布。
If you like my recipe, click hereLIKE & follow Miki's Food Archives Facebook page or follow us on Instagram: mfa_dingoozatfood  to receive more recipe updates. Don't forget to change the setting to 'SEE FIRST' if you wish to see my post on your Facebook news feed. 


Enjoy!

Thursday 20 July 2017

Stir Fried Tomato & Scrambled Eggs In Laksa Sauce 星洲辣沙番茄炒蛋


Stir Fried Tomato & Scrambled Eggs aka Tomato Fried Eggs is one of my all times favourite.  Even my boy who doesn't eats tomatoes loves the eggs and gravy. 

This is a new recipe with new flavour that I have created using Dancing Chef Laksa Paste that is made of all natural ingredients with no MSG, no preservative or artificial colouring. Unlike the sweet version that I have shared in my old post in 2014, this is hot and spicy added our local favourite Laksa flavour! So appetising and delicious. If you're trying out this recipe, do cook more rice to go with it. ;)


If you are cooking for young children or elderly who doesn't take spicy food, you can find my "original" tomato fried egg recipe HERE , which is sweet in taste. 


Ingredients: 材料


1 Tomato (cut into chunks, sprinkle 1/2 tsp sugar, set aside)
番茄 1粒,切块。番茄切好后撒1/2小匙细砂糖拌均,可以减少番茄的酸味。


2 Egg (add a pinch of salt, lightly beaten)
鸡蛋 2粒 (加一点盐,稍微打散)


3 tbsp chopped Spring Onion (reserved 1 tbsp for garnishing)
青葱碎 3 汤匙


1 1/2 tbsp Dancing Chef Laksa Paste
星洲辣沙酱 1 1/2 汤匙


3 tbsp Water (more/ less, add to taste)
水 3汤匙,可加减分量


1 tbsp Coconut Cream
椰浆 1汤匙


1/2 tsp Sugar 
细砂糖 1/2 小匙


If you are sharing this recipe, kindly attach the link to this blog instead of screen capture/ copy & paste/ use in your blog and claimed as your recipe! Thank you.

如果您要分享此食谱,请联系这个部落格的相关链接。敬请不要复制或改篇为自己的食谱。谢谢!


Method:步骤

1. Heat oil in a skillet (high heat) , fry egg into big chunks until 'almost cooked'. Remove from heat, set aside. Do not overcook the eggs.
烧热油,把鸡蛋以大火快速煎至接近熟(半煎炒)。离锅。煎蛋要用热油,大火,煮太久的话,鸡蛋会变硬,就不好吃了。


2. Heat oil in skillet, add 2 tbsp spring onion, cook until fragrant. Add in Laksa Paste, fry for few second, add in tomatoes. Stir fry to combined. Add water, sugar and coconut cream, bring to a boil. Reduce heat and simmer for 1 minute or until the sauce started to thicken. 
烧热油,加入2 汤匙的青葱碎,爆香。加入辣沙酱,爆香。加入番茄,炒至水份蒸发。加入水,椰浆和糖,转中小火煮至酱汁开始浓郁。

3. Stir in fried eggs. Simmer for 1 minute. Garnish with chopped spring onion. Serve warm with rice.
加入已煎好的鸡蛋,煮至收汁,撒上剩余的青葱碎即可。若喜欢我的食谱,可以LIKE和追随我的面书专页,不要错过最新食谱发布。

If you like my recipe, click hereLIKE & FOLLOW Miki's Food Archives Facebook page to receive more recipe updates. Don't forget to change the setting to 'SEE FIRST' if you wish to see my post on your Facebook news feed. Enjoy!


Friday 14 July 2017

Easy Chicken & Mushrooms Steamed Bun/ Pao 简易鸡肉包


Steamed bun/ pao are popular dim sum item in Asia. Made with different kind of fillings such as BBQ pork aka Char Siew, custard, salted egg yolk, red bean paste, lotus paste, kaya and many more. One of the common filling is Steamed Bun With Chicken & Mushrooms. 

>> Get my popular BBQ Pork Steamed Bun aka Char Siew Pao recipe here >> 


Cute Chinese Steamed Bun with Chicken & Mushrooms Filling aka Steamed Chicken Pao.

When I have time, I'd make my chicken pao into cute chicken shape buns.
When I'm in a rush, this plain old shape is good enough.


There are many ways to marinate the chicken fillings. The quickest method is to use chicken rice paste. That really saved a lot of time. Of course, do remember to choose one with no preservative, no MSG and no artificial colouring. ;)


Delicious chicken & mushrooms fillings. So flavourful! 


Tips: Cooled completely on the rack before storing.

For leftover, once cooled, store in the freezer. Reheat before serving.

Another batch of Chicken & Mushrooms Steamed Bun requested by my boy,
he wanted to have plain white bun with a red dot on top because one of his friend from China told him that back in her "village", they make steamed buns with red dot that will bring good luck to the family... I'm not sure if it's true, to my understanding, the dot is the colour code to differentiate the types of steamed buns :D
Photo updated: October 2019


Ingredients: 材料
(10 servings)
Prepare the filling: 馅料

190g Chicken (boneless chicken leg, sliced thinly) 鸡肉 190克,切条

2 Shiitake Mushrooms (diced) 香菇 2粒,切碎

1/2 tsp Corn Flour 玉米粉/粟粉 1/2 小匙

2 tbsp Chicken Rice Paste 海南鸡饭酱 2汤匙

5g Spring Onion (chopped) 青葱碎 5克


This time, I use Dancing Chef paste.
If you couldn't find this brand, you can use other brand. 

Prepare the dough: 面团

(A)

300g Hong Kong Flour 香港粉 300克

1 tsp Baking Powder 发粉 1小匙

1 tsp Instant Yeast 酵母 1 小匙

40g Sugar 糖 40克

(B)

1 tbsp Cooking Oil/ Lard 菜油/猪油 1 汤匙

150g Water 水 150克


If you are sharing this recipe, kindly attach the link to this blog instead of screen capture/ copy & paste/ use in your blog. No parts of the content of this blog may be reproduced without prior written permission. All rights reserved. Thank you. 


如果您要分享此食谱,请联系这个部落格的相关链接。敬请不要复制或改篇为自己的食谱。谢谢!


Method:


1. Mix all fillings ingredients in a bowl. Cover with cling wrap, keep in the refrigerator, marinate for 4 hours or overnight. 
将所有馅料的材料混合,用保鲜纸盖好,放进冰箱腌4小时或隔夜。


2 Mix (A) in a bowl, gradually stir in (B) to form a dough and continue to knead about 5-10 minutes until smooth and elastic.
将所有材料搅拌成团,揉5-10分钟至光滑有弹性。我用手揉,可以不用搅拌器。


3. Cover with cling wrap and let it rest for 40 minutes.
盖上保鲜纸,发酵40分钟。


4. Transfer the dough on the lightly floured worktop, knead for 2 minutes. Divide dough into 10 portions (50g each), roll out the dough, add fillings, shape as desired and let it proof for 40 minutes. Steam in a hot steamer for 15 minutes. 
取出,放在做面上揉两分钟。分割,包馅,造型。发酵40分钟。蒸15分钟。


5. When it is done, turn off the heat, let it sit in the steamer for 5 minutes before removing from the steamer. 
蒸好后熄火,待5分钟后才将包子取出。若喜欢我的食谱,可以LIKE和追随我的面书专页,不要错过最新食谱发布。

If you like my recipe, click hereLIKE & FOLLOW Miki's Food Archives Facebook page to receive more recipe updates. Don't forget to change the setting to 'SEE FIRST' if you wish to see my post on your Facebook news feed. Enjoy!


Some feedback from those who have tried this recipe:


By Grace Tan
By Triffany Seow 

Related Posts Plugin for WordPress, Blogger...